For times when a pie or a cake simply is not enough.

PIECAKEN is a whole pie baked inside of a cake. Any cake. Any pie. PIECAKEN has endless flavour combinations, which is why this web page exists. So when a pie or a cake simply is not enough, turn to this page for recipes, ideas, photos and events dedicated to PIECAKEN. It is a celebration all on its own, baked into one delicious dessert.

Sunday, December 20, 2015

Christmas Piecaken Fun!


 Last week, I made two Piecakens as donation for a school Christmas concert. So I gave one of my recipes a festive spin, and made changes to another one to see if I could improve.

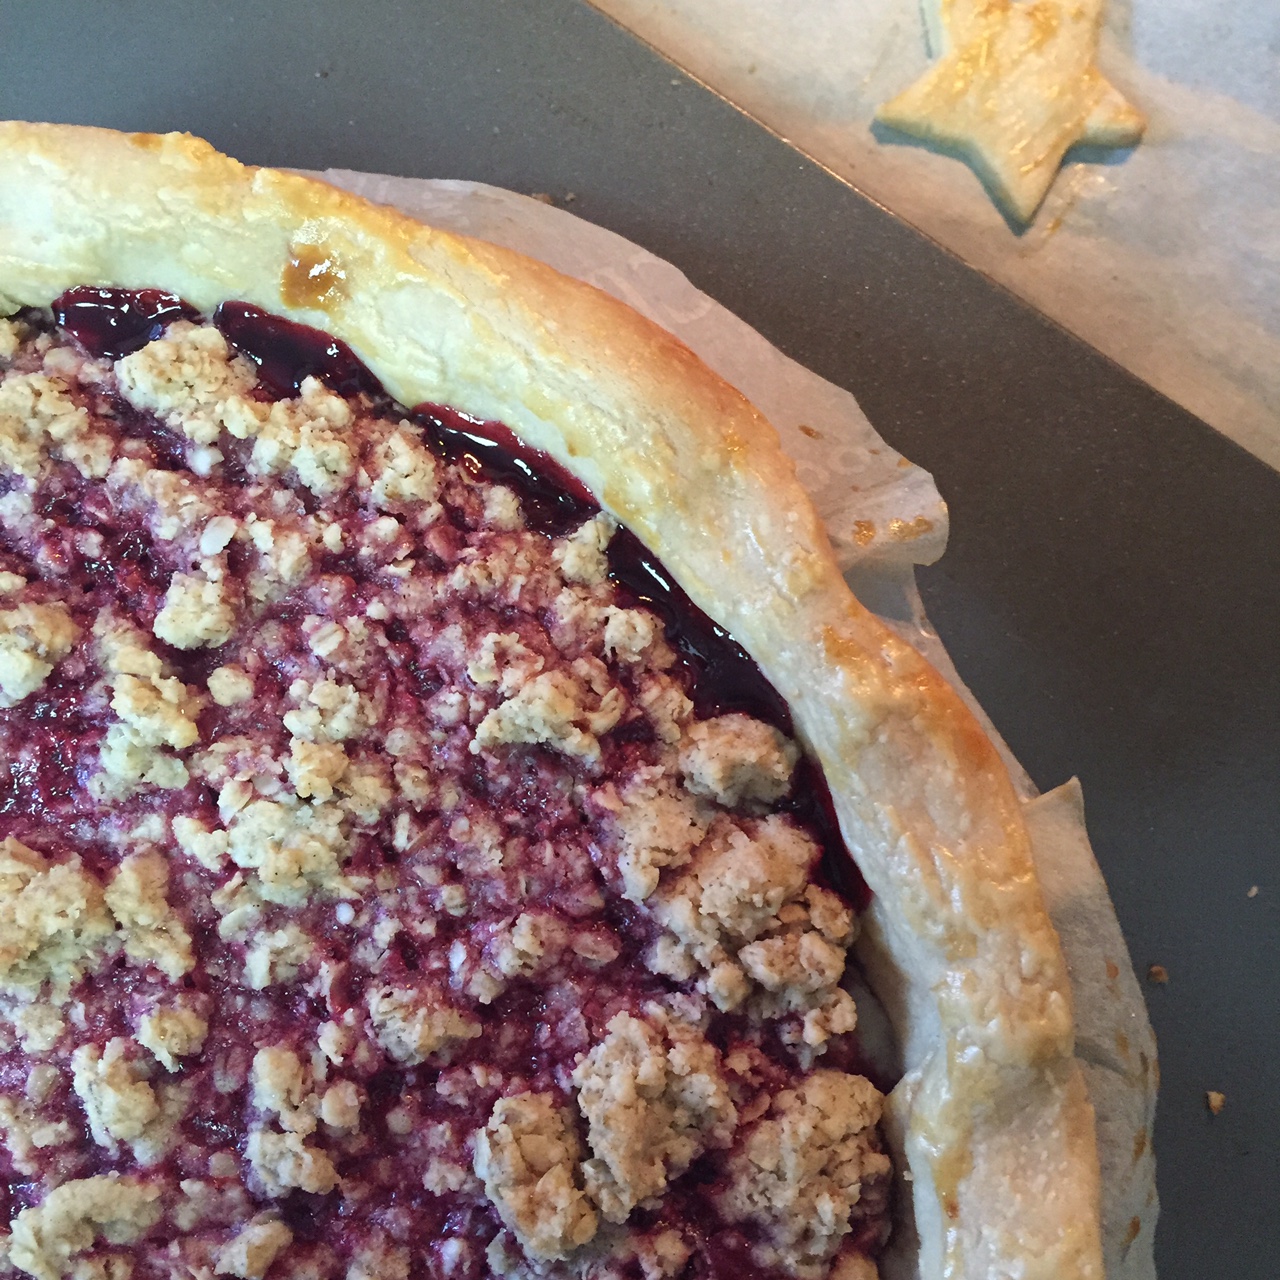
The first was the chocolate-raspberry piecaken (click here for the recipe), which is the same recipe that went viral a few weeks back.  And no, that is not a chocolate cherry piecaken, as some people have thought - it's a raspberry pie in that chocolate cake! Although chocolate and cherry are a great combination, I find that larger groups tend to prefer raspberry and dark chocolate because the taste of cherry can turn many people off. So a Raspberry-Chocolate Piecaken, I made, but with one change - I made a crumble-top raspberry pie. It became festive with the addition of a chocolaty Christmas tree and some icing to represent snow. A few shiny truffles and Christmasy chocolates topped it off.

Scroll down to find out how to make a chocolaty Christmas tree!

The second cake was my Apple-Crumble-Top Piecaken recipe - which is an apple pie inside a cheesecake.  This time I made an more traditional apple pie that was fully encased in a pie crust.  And I did not bake the crumble top onto the cheesecake.  Instead, I baked the cheesecake (with pie inside, of course!), then let it cool and pour Dulce de Leche caramel sauce on the top.  I then sprinkled an abundance of cookie crumble on top, that I pre-toasted (and cooled!) in the oven separately.  I felt this would make the cake easier to cut.  It also made it easier to include caramel sauce.  After all, who doesn't love apple pie with caramel sauce??

Here is my recipe for cookie crumble topping...


Cookie Crumble Topping Recipe:

You need:
1 cup quick-cooking rolled oats
1/2 cup flour
1/3 cup butter, melted for 55 seconds in the microwave
1/4 cup granulated sugar (or brown sugar, but I like chunky organic cane sugar for this)
1/2 tsp cinnamon

Instructions:
Mix together in a small-to-medium-sized bowl.  Using your hands, squish together to make larger chunks or balls (about 1" or less in size). Place on a cookie sheet and bake for 12-15 minutes, checking them at 10 minutes to be sure they don't burn and simply, toast and brown a little to harden them a bit. Let cool fully, then sprinkle over your cheesecake.


How to Make a Simple Chocolate Christmas Tree:

You can make Christmas trees out of chocolate with no real tools but a Ziplock bag. Simply place melted, tempered chocolate in a Ziplock bag, cut one tiny corner off and squirt the chocolate onto a piece of waxed paper in swooshing motion to make a tree.  If you don't like the look of your tree, you can use a gloved finger to make more swooshing motions to better shape the tree until you get the shape you want (provided the chocolate is still wet and hasn't set).  Make sure you make a tree 'trunk' so you can stick it into the cake.  Let the chocolate tree set in the fridge on the waxed paper for 15 minutes, then tuck it into the top of the cake. Use white icing to decorate around the base of the tree for 'snow'.  You can even decorate the tree with candies or candy cane pieces to make it more festive.

Happy Holidays!

Sunday, November 29, 2015

Apple Crumble Pie Inside a Cheesecake Piecaken!

Since my piecaken photos and recipes went viral this week, showing up in all sorts of media publications, including New York Times online, Playbuzz, Distractify, and many more, I thought it might be time to get baking and feed all my readers with another piecaken idea and recipe.

With the winter comfort-food season upon us, I figured it was time to bring in some apple pie.  And since I am all about crumble-top pies and cheesecake, why not put a crumble-bottom apple pie inside a crumble-top cheesecake?  Cinnamon, shortbread, oats, apples and cream cheese all in one sweet cake? Oh yeah.

There is no real pie crust in this cake, so you can make your life simple and buy a store-bought apple crumble if you like. Or you can use an apple pie instead, crust and all.  Make it your own! But if you need a crumble-bottom pie recipe and a crumble-top cheesecake recipe, you've come to the right place. So let's get started!

Recipe: Apple-Crumble Cheesecake Piecaken

Time: 3 to 4 hours, including cooking time. You can do this in one evening if you start early enough - it is best to chill overnight before slicing. Or spread our baking over two days (i.e. make your crumble pie Friday night, bake it inside the cake on Saturday morning. Chill then slice 6 hours later for Saturday evening dinner!).

For the cake:
8" Springform baking pan (this makes about 10 good sized pieces, but if you want to go bigger, double your cheesecake recipe and use a 9" or 10" pan and increase the baking time by 15 minutes).

Cake Crumble Top Ingredients:
1 cup instant oats
1/4 cup unbleached all purpose flour
1/4 cup brown sugar
1/4 tsp cinnamon
1/3 cup butter, melted

Cake Batter & Crust:
About 2 cups of shortbread or oatmeal cookies, broken up (place in a plastic freezer bag, seel, then crush them with a rolling pin or cup while in the bag).
1/3 cup butter, melted
2 and 1/4 packages of cream cheese (250 gram packages), room temperature
2/3 cups + 1/3 cup of sugar
3 large eggs
1 and 1/4 cup sour cream
1/8 tsp cinnamon
Optional: vanilla extract

For the Pie:
Small 6" to 7" cake pan, tart pan or pie pan, buttered and lined with parchment paper.

Pie Crust:
1 cup instant oats
1/4 cup brown or golden cane sugar
1/4 tsp cinnamon
1/3 cup butter (I used unsalted, but use what you have on hand)

Filling:
3 apples, peeled and sliced
1 cup brown sugar
1/2 tsp cinnamon
1 tbsp. lemon juice


Instructions:

Start by making your crumble-bottom pie (or store-bought apple crumble if you wish).

1. Place sliced apples, lemon juice, cinnamon and brown sugar in a medium bowl and mix together to coat apples. Set aside.

2. Melt your butter in a small dish in the microwave for 40-45 seconds.

3. Place your brown sugar, oats, and cinnamon into a medium bowl and stir together.

4. Pour the melted butter over top of the dry ingredients and stir.

5. Press the mixture into the bottom of your small cake or pie pan and up the .

6. Place your apple slices on top of the crust, in a circular pattern (although not necessary) and once all the apples are in, pour the remaining liquid on top of the whole thing to ensure the apples are coated.

7. Bake for 1 hour at 350 degrees F.

8. Let the pie cool for 1 hour while you make your cake (or longer if you wish).

Make the Cake Crust and Batter, and Assemble for Baking:

1. Prepare your  springform pan by greasing the bottom and sides, then lining the bottom with a round of parchment paper and buttering the top of the paper too.

2.Place the crushed cookies, melted butter and 1/3 cup sugar in a medium bowl. Mixed together until cookies are damply coated with butter. Press into the bottom of the pan evenly, and slightly up the sides if you have enough cookie crumbs.

3. Bake the crust for 10 minutes in the oven at 350 degrees F.

4. While the crust is baking and cooling, beat the cream cheese for 1 minute in a stand mixer, stopping the mixer occasionally to stir in the un-softened bits in the bottom.

5. Add the sugar slowly and beat until incorporated (30 seconds).

6. Add the eggs, one at a time, stirring between each addition to ensure no lumps form.

7. Add the sour cream and beat just until mixed. 

8. Add the cinnamon, and the vanilla (if using) and stir in.

9. Pour just under 1/2 the batter onto the cake crust.

10. Flip your crumble pie upside down onto the centre of the cake batter in your springform pan.  If it comes apart a little in the process,  don't worry,  just tuck it back together, leaving a ring of cake batter around the edges at least 1" wide.

11. Pour the rest of the batter on top of the crumble pie, and spread around to cover entirely.

12. Place in the oven, and set your timer to bake for 15 minutes (to start!).

13. During the first 15 minutes of baking time, prepare your crumble-top by melting the butter in a medium bowl, then toss in the sugar, oats, flour and cinnamon and stir until moist.

14. When the timer beeps, pull your cake out of the oven (or just move the rack out with the cake on it and leave the oven door open). Sprinkle the crumble top in the middle of the cake. Put your cake back in the oven and add 45 minutes to the cooking time.

15. When 45 minutes is up, check the cake to ensure it only jiggles a little and looks cooked (usually a cheesecake cake lifts/rises around the edges, indicating it is done).  If it looks undercooked in the middle, add 10 minutes. When ready, simply turn off the oven and let the cake cool with the door open.  Then, after 30 minutes, remove it from the oven and let cool for another hour before refrigerating for at least 4 hours before slicing.

Slicing Tip:
Use a hot knife to slice the cake.  Also, hold the crumble or top of the cake up a little with your fingers each time you slice it, so you don't squish all the pie out of the cake with each slice.  If you cut carefully, you will get great results!  Heat your knife with warm water and dry with a paper towel between each and every slice.

Saturday, October 10, 2015

Pumpkin PIECAKEN: Pumpkin Pie in a Milk Chocolate Fudge Cake

Here is a delicious idea for a Thanksgiving PIECAKEN! A pumpkin Pie in a Milk Chocolate Fudge Cake topped with a pumpkin-spiced milk chocolate ganache and buttercream - delicious!


I originally posted this one as an idea for a PIECAKEN only, but some people have been asking for the recipe, so here it is:

Recipe: Pumpkin Pie in a Flourless Milk Chocolate Cake PIECAKEN

First, make or buy a Pumpkin Pie.  You can use my recipe here from my Cheesecake Pumpkin Piecaken recipe to make a pumpkin pie from scratch: http://piecaken.blogspot.ca/2013/11/recipe-for-pumpkin-pie-in-vanilla.html. Once you have a pumpkin pie, you can make your flourless milk chocolate cake (this recipe is doubled, so if you just want a flourless milk chocolate cake, cut the recipe in half an bake for 40 minutes in a 9" springform pan.

First up: Preheat your oven to 350 degrees F.

1. Melt together 20 ounces of milk chocolate with 1/2 pound of butter in a stainless steel bowl over a double boiler or in the microwave (in plastic or glass bowl) for 2 minutes and stir until melted.
2. Once melted, add 1.5 cups of sugar and stir.
3. Add 8 eggs and beat briefly with a hand mixer.
4. Add 1 tsp of real vanilla extract.
5. Pour half the mix into the bottom of a 9" springform pan lined with parchment paper.
6. Flip your cooked pumpkin pie upside-down onto the batter, in the center.
7. Pour the rest of the batter on top of the pie and spread around into the sides until you have a level coating.
8. Bake in a preheated 350 degree F oven for 1 hour (check it and add 10 minutes if it looks undercooked in the middle - piecakens can be unpredictable at times).
9. Run a knife around the outside of the cake (inside of the springform pan) then let cool on counter for several hours, then refrigerate.
10. Flip out and over (so your pie is right-side-up) onto a serving plate. Top with topping recipe below.

Topping:

Heat 1/2 cup cream in a small saucepan until it just reaches boiling point. Pour over a bowl of 8 ounces of chopped milk chocolate. Stir until smooth and then pour over the cake, letting some drip down the sides. Chill the cake and then decorate as you wish, with Pumpkin-spiced buttercream icing or crunchy caramel bits, or whatever you like!

Friday, July 31, 2015

Introducing The Ice Cream-Pake: Strawberry Pie Inside of a Cookies-and-Cream Ice Cream Cake

I have been making homemade ice cream like crazy lately. And although I LOVE to experiment with chocolate ice cream, I have a lot of fun making different versions of vanilla ice cream too.

So when I made an awesome batch of Cookies and Cream Ice Cream, I decided to something more profound with it than just eat it. Instead, I made an Ice Cream Cake Piecaken, or Ice Cream Pake as I like to call it (get it? Instead of Ice Cream Cake, I wrote...oh you get the picture).

Since strawberry season is in full swing, I figured what better way to celebrate than to make a pie?  And then what better pairing than Cookies and Cream Ice Cream, Chocolate ganache and Strawberries?

So here is a visual set of instructions as to how to make the same at home. Trust me, this is a party pleaser!

1. Make a cookie crumb crust using crushed Oreo Cookies or Chocolate Wafer Cookies in an 8" springform pan ( mix together about 1.5 cups of crumbs, 1/3 cup of sugar and 1/3 cup of melted butter together then press into the base of your pan). If your pan is not tall enough, get creative an make a clean cardboard roll to insert to increase height.


2. Make or buy Cookies and Cream ice cream (for a recipe for homemade ice cream, click here)


3. Scoop half the ice cream onto the crust.

4. Take a homemade or store bought 8" strawberry pie, remove the pie pan and place gently onto the ice cream cake base.

5. Use nearly all the ice cream to add a layer to the top of the pie. Reserve a half cup in the freezer to fill in cracks later.

6. Wrap it and freeze for 2 hours.

 
7. Remove from freezer, then run a knife around the inside of the pan sides. Release and remove the springform sides.

8. Use the remaining ice cream to fill in the cracks around the pie. Press cookie crumbs into the sides if you wish, just for an added yum! factor.


9. Top with chocolate ganache (4 ounces of semi-sweet chocolate and 1/2 cup whipping cream melted together in the microwave for 1 minute, stirred until smooth) and a few more cookie crumbs.


10. Freeze for at least 2 hours. Slice using a hot knife (I'm not sayin' this part is easy, but it can be done!)


Move over Dairy Queen, and meet the new Queen of Ice Cream Cakes! ...er 'Pakes'.

Thursday, April 23, 2015

PecanPIECaken - A Pecan Pie Inside a Maple Dark Chocolate Truffle Cake

I have been wanting to pair up my home-roasted pecans with a flourless chocolate cake for as long as I can remember, but have never got 'round to it for some reason. And then I thought, why not put a pecan pie inside of a flourless dark chocolate cake? This seemed to be the inspiration I needed, because I jumped right to the task without hesitation.

The overall taste was delicious. A rich, fudgy not-to-sweet chocolate cake surrounded a sweet pecan pie. The whole thing was topped with a maple-chocolate glaze, which added a nice, smooth finish to this over-the-top dessert.

Here is how to do it:

1. Make (or buy) a pecan pie.  I prefer to make my pies because the ingredients are all natural - most store-bought pies have all sorts of modified cornstarch and hydrogenated oils in the ingredients, so it is best to just make it. I made this recipe: http://www.foodnetwork.com/recipes/food-network-kitchens/p/pe/pec/peca/pecan-pie-recipe.html.  I modified it only by using rum instead of rye and changing the brown sugar to muscovado. I also used an 8" pie plate instead of 9", and I lined the pie plate with parchment paper to make it easier to extract the pie.

2. Prepare the batter for a Maple Flourless Chocolate Cake by doubling the recipe at this link: http://ultimatechocolateblog.blogspot.ca/2013/07/maple-dark-chocolate-truffle-cake.html. You can also use maple syrup instead of maple sugar crystals, or if you don't have any maple syrup, forget it in the cake and use regular granulated sugar.

3. Once you have the batter prepared, then prep a 9" or 10" springform cake pan by lining the bottom with parchment paper and buttering the paper and the sides. Pour half the batter into the bottom of your cake pan. Then flip the pie upside down onto the centre of the batter. Pour the rest of the cake batter on top of the pie.

4. Bake the entire PIECAKEN for 50 minutes to 1 hour in an oven that is pre-heated at 350 degrees Fahrenheit.  With flourless chocolate cakes, it is difficult to tell when they are cooked. But I just scrape back a little of the top see if it looks slightly spongy.  If it is wet and still completely uncooked, add a few more minutes. 

5. Let cool for an hour on a rack on the counter, then refrigerate until completely cooled.

6. Run a knife around the insides of the cake pan and then open and remove the sides. Flip the entire PIECAKEN upside down onto your serving plate.

7. Top with a maple-chocolate glaze (the 'ganache' recipe here) and roasted pecans, or chocolate shavings.

8. Makes 12-16 servings. Remember: this is rich so pieces do not need to be very big!

Enjoy!

Tuesday, February 3, 2015

Gluten-Free No-Bake Peanut Butter Cheesecake & Chocolate Piecaken

The healthiest PIECAKEN yet!   er...?

This is absolutely delicious. However truthfully, 'healthiest' is probably not the best way to describe this PIECAKEN, but I did make it only with organic coconut sugar (no cane sugar) and with no flour and no gluten, so it seems to fit into all the trendy health-food categories.

Here is my recipe and pictures to show how I did it:

Recipe: No-Bake Peanut Butter Cheesecake & Chocolate Pie PIECAKEN

Ingredients:

For the cookie crust:
1 cup of peanut butter (I used Kraft Natural, but you can use your favourite PB)
1/2 cup of organic coconut sugar (you can use regular granulated sugar, if you want)
1 large egg, lightly beaten with a fork

For the "no bake" cream cheese filling, you need:
1 cup peanut butter
1 pkg cream cheese, softened to room temperature
1.5 cups of whipping cream, whipped and set aside in fridge
2/3 cup of organic coconut sugar (or use regular granulated sugar if you wish)


For the Chocolate Tart filling:
10 ounces of milk chocolate, chopped into 1/2" - 1" inch pieces
3/4 cup of whipping cream

For the Topping:
6 ounces of milk chocolate, chopped
1/2 cup of whipping cream

Tools:

One 9" Springform pan and one 8" pie plate or tart pan (you can use a 4" pie or tart pan like I did (I got an extra tart out of the deal!)

Instructions:

For the cake and tart crusts:

  1. Preheat your oven to 350 degrees F
  2. In a medium bowl, beat together the peanut butter and sugar until mixed with, then add the egg and stir until combined. Press the mixture into your parchment-lined tart or pie pan and into your cake pan (i.e. you are making a crust for the pie and a crust for the outer cake). If you have chosen to make a small cake, you can make two crusts of each.
  3. Bake the crusts for 12 minutes, until it starts to brown, then remove from the oven and let cool while you make all the other ingredients.

For the chocolate tart filling:

  1. Place your chopped chocolate into a microwavable bowl. Pour the whipping cream over the chocolate. 
  2. Microwave for 2 minutes on half power and then stir until smooth. Pour the filling into the tart crust. Immediately place your tart in the refrigerator and chill until firm.

For the cheese cake filling:


  1. In a medium bowl, beat your whipping cream until stiff.  Do not overbeat (if it starts to look a bit bumpy, stop mixing). Set aside in the fridge.
  2. Beat your cream cheese in a large bowl until softened and mixed. Add the sugar and beat until fluffy. Be sure to use a spatula to scrape the bottom of the bowl to incorporate any unmixed cream cheese.
  3. Add the peanut butter and beat until combined and fluffy.
  4. Take your whipped cream out of the fridge and scoop 1/3 of it into the peanut butter/cream cheese and mix with beater on low until combined. Then fold in the remaining whipped cream gently with a spatula.
Assembling the PIECAKEN:

  1. Scoop half of the cream cheese mixture into your springform cake pan.
  2. Pick up your Chocolate Peanut Butter Tart and carefully remove the pie plate and parchment and then place it on the bottom layer of cream cheese filling, in your cake pan. Press it down a little to ensure the filling surrounds the tart.
  3. Scoop the remaining filling on top of the tart and smooth it out.  If you have some left, you can put it in a pastry bag and use it to make designs around the edges of the cake.


Make the topping:


  1. Place your chopped milk chocolate into a microwavable bowl and pour the whipping cream on top of it. Microwave on half power for 2 minutes. Take out and stir until smooth. 
  2. Pour over the cake and either: let drip down the sides a little or, if you have built up the sides of the cake you can pour it into the centre (see picture to the right for an example).
  3. Refrigerate the cake immediately.  Once chilled for 1 hour, you can run a knife around the inside of the springform pan sides and remove them. You can transfer to a serving plate if you think you can do it without breaking the cake. Refrigerate until ready to serve.
Additional tips:
  • Can be frozen if well sealed.
  • Best to keep a lid on this while in the fridge (or in a box wrapped in plastic) in order to keep the cream cheese from getting a thick outer layer.
  • For extra chocolaty-ness, you can add a layer of chocolate filling on top of the cookie crust just before adding the cream cheese filling and assembling the PIECAKEN.  I did that and it helped to hold the crust together, but the extra calories certainly are not necessary!

Monday, January 5, 2015

Nearly No-Bake Cheesecake with a Pumpkin Pie Tucked Inside!

This delicious piecake, or PIECAKEN, as I call it, was whipped together in 20 minutes.  You might ask: How can that be?  PIECAKENs normally take hours to make, with hundreds of steps and ingredients!  But no, of course it can take only 20 minutes when you don't need to bake it, and when you buy a store-bought pie. Oops.  Did I really say that out loud? 

That's right folks, the pie was store-bought for this week's creation, but only because I needed to make a super quick dessert, for a sort-of-short-notice kind of dinner party. So I bought the pumpkin pie.  I figured it would be the last of the season and might as well enjoy it now, because it will be 8 months or so until Pumpkin Pie Season is back in full swing. And with some shortbread cookies and an easy, no-bake cheesecake recipe the whole thing came together quickly.

This is delicious. Want to make one? Here is what I did:

1. So I quickly crushed some shortbread cookies (about 2 cups of store bought, or find a recipe here), and mixed them with 1/4 cup of melted butter and 1/4 cup of evenly mixed organic coconut sugar and organic cane sugar, then pressed the mixture into a parchment-lined 8" springform pan. I baked this in a preheated 350 degree oven for 12 minutes, then I let cool on a rack, and finally placed it in the fridge to fully cool.

2. I warmed 2 packaged of cream cheese (250g each, packaging removed) in the microwave for 30 seconds until room temperature.  While doing that I whipped 1.5 cups of whipping cream in my stand mixer until stiff. I transferred the shipping cream to another bowl, and then placed the warmed cream cheese in the stand mixer bowl that I used to whip the whip cream.  I whipped it for about 10 seconds, stopped the mixer, stirred in the bottom bits of cream cheese with a long spatula, and whipped it again for about 15 seconds. 

3. Then I added 2/3 cups of sugar slowly, while whipping on low and stirring with the spatula (stop the mixer to stir if necessary). Then I whipped it on high for about 20 seconds.  Stopped the mixer and stirred again and whipped again until just combined and lightly fluffy.

4. I then added 1 tsp of real vanilla extract and beat until combined (10 seconds), then added in half the whipped cream and whipped on low until combined. I stirred the bottom in and beat again for a few seconds.  Then I took the whole bowl out and slowly folded in the rest of the whipped cream.

5. Next, I placed half the mixture onto my cooked and cooled crust.  Then I took off the pie plate (carefully) and placed the pie, right-side-up, onto the crust and cream cheese mixture.  Next I topped the whole thing off with the rest of the cream cheese mixture.  I used a flower cut-out to sprinkle a mixture of cinnamon and coconut sugar on the top of the cake and let set in the fridge for an hour.  Once ready to serve, I simply cut around the edges with a knife, just inside the sides of the springform pan.  I carefully transferred to a serving plate (although you don't have to) and voila! A PIECAKEN was born.

For a homemade pumpkin pie recipe, click here.

What kind of quick PIECAKEN recipe can you whip up?  Feel free to share in the comments below or tweet me @ultimatelychoc with a picture of your creation!